What Can an Infrared Thermal Imaging Camera Really Detect?

When you walk through a home, you’re only seeing part of the picture. Walls, ceilings, and floors hide a lot, and some of the most costly problems a home can have, including moisture intrusion, failing insulation, and electrical hot spots, are completely invisible to the naked eye.

That’s exactly where an infrared thermal imaging camera earns its place in a home inspection. Rather than replacing what a trained inspector can see, it extends what’s possible, picking up heat variations that signal hidden problems before they show up as water stains, mold, high utility bills, or something worse.

If you’re buying or selling a home in the Atlanta area and wondering whether thermal imaging is worth including in your inspection, here’s a clear look at what it actually detects and why it matters.

How an Infrared Thermal Imaging Camera Works

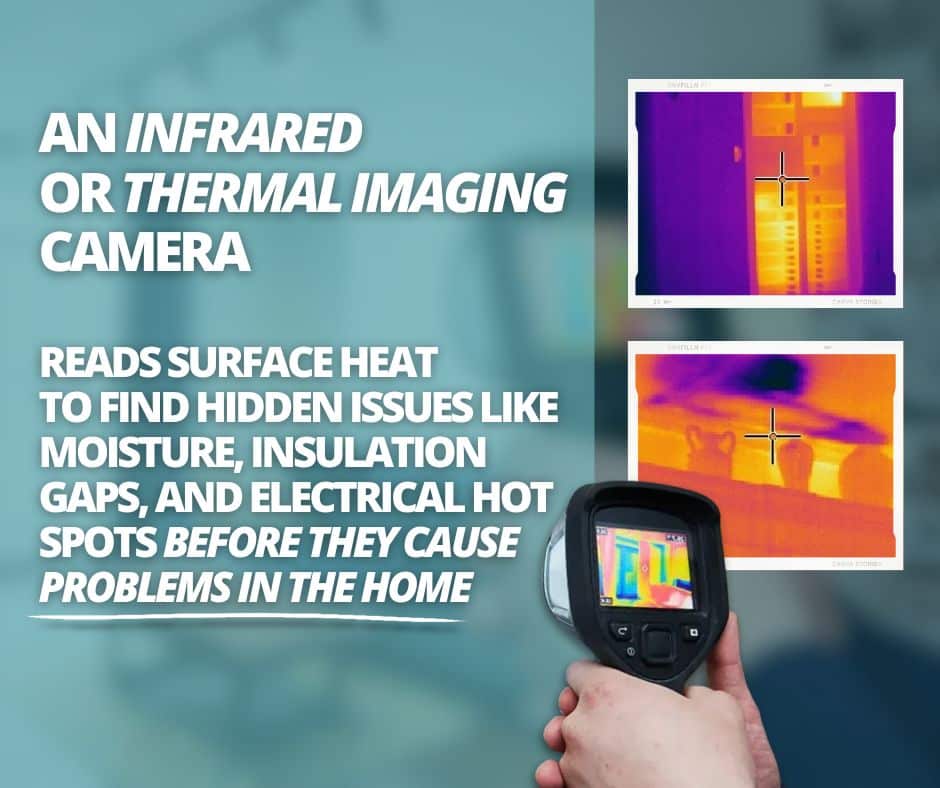
An infrared thermal imaging camera doesn’t see through walls. It reads surface heat.

Every object gives off thermal energy. When something behind a surface is going wrong, whether that’s trapped moisture, a leaking pipe, or an overheating electrical component, it creates a temperature difference that shows up in the camera’s image as a color variation.

The camera translates those differences into a visual gradient, with warmer areas appearing in lighter tones and cooler or wetter areas appearing darker.

A trained inspector reads thermal images alongside the visible inspection to identify anomalies worth investigating further. The result is a more complete picture of a home’s condition, particularly in the areas where problems tend to hide the longest.

what a thermal imaging camera can detect

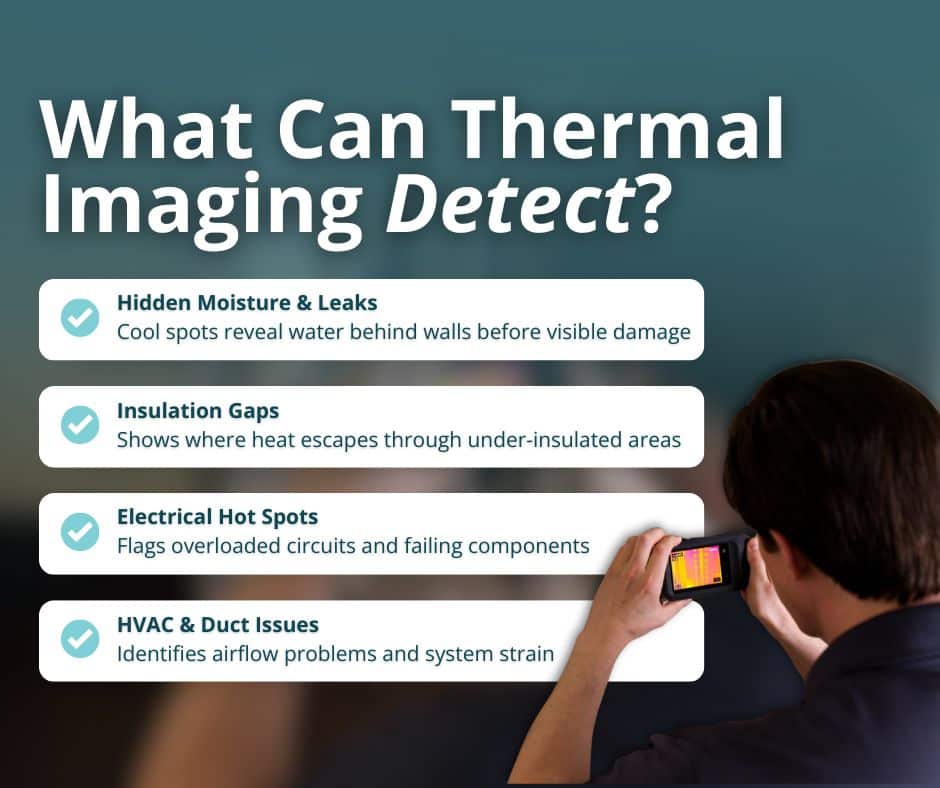
What Thermal Imaging Can Detect

Thermal imaging picks up on a wider range of hidden issues than most homeowners expect. Here are the most common and consequential things it can identify during a professional home inspection.

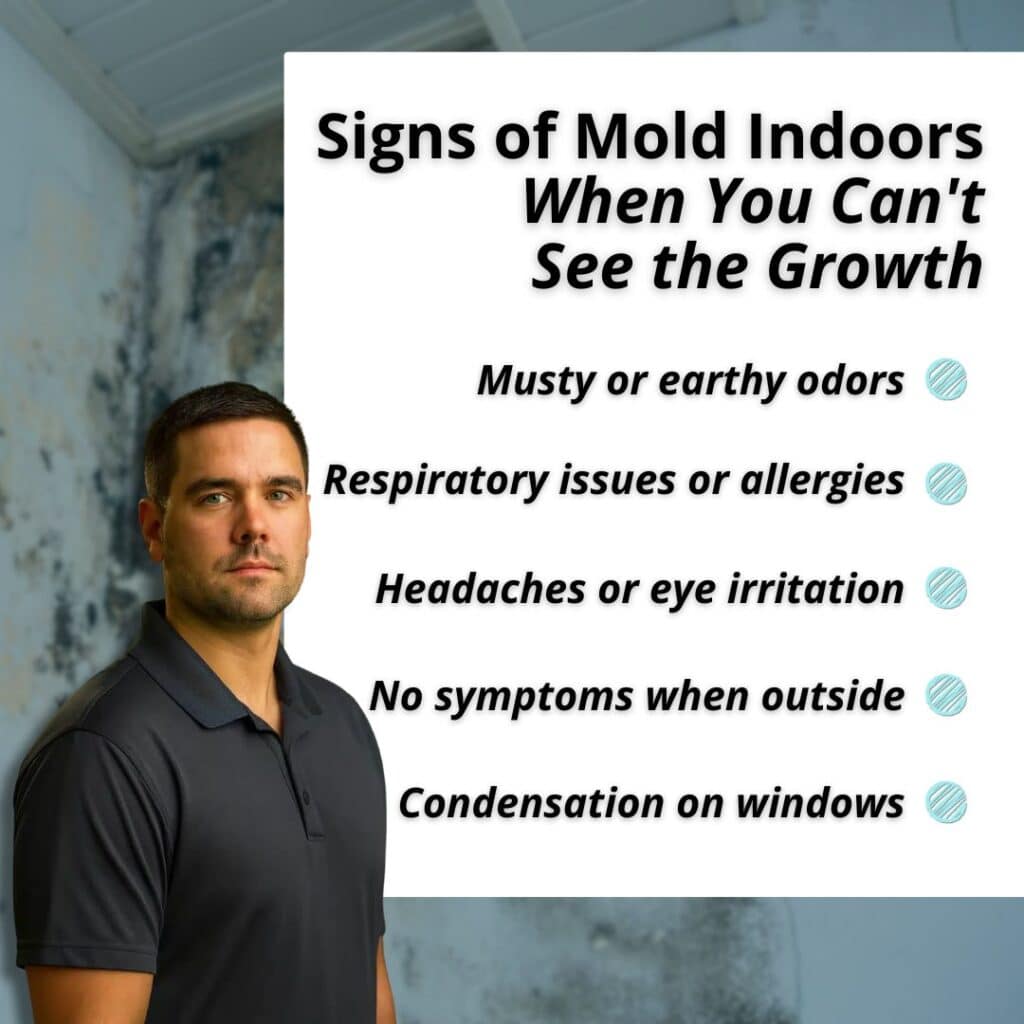
Moisture Intrusion and Hidden Leaks

Moisture is one of the most damaging and hardest-to-spot problems in a home. It can enter through a compromised roof, a slow plumbing leak, a failing window seal, or a foundation crack, and sit inside walls or ceilings for months before visible damage appears.

Because water absorbs and releases heat differently than surrounding building materials, it shows up in thermal imaging as a cool, irregular spot on an otherwise uniform surface. This makes it possible to identify active moisture issues or areas of prior water damage behind drywall, under flooring, or above ceilings without any destructive investigation.

In the Atlanta metro area, where summer humidity is high and heavy rain is common, moisture intrusion is one of the most frequent findings during a thermal imaging inspection.

Insulation Deficiencies

Missing, compressed, or improperly installed insulation rarely announces itself until you’re looking at an unusually high utility bill. Thermal imaging makes those gaps visible by showing where heat is escaping or entering through under-insulated walls, ceilings, and floors.

For buyers in older Atlanta-area neighborhoods like Decatur, Smyrna, or East Cobb, this finding is especially relevant. Insulation in older homes may have settled over time, been disturbed during a renovation, or never been adequately installed to begin with.

Electrical Hot Spots

Overloaded circuits, loose connections, and failing components generate heat before they cause visible damage or trip a breaker. Thermal imaging can identify these hot spots during a home inspection, flagging electrical anomalies that warrant closer attention from a licensed electrician.

This is one of the most safety-critical applications of the technology. Electrical issues are among the leading causes of house fires in the U.S., and catching an overheating component early is exactly the kind of finding that makes a real difference.

HVAC Performance Issues

Rooms that run noticeably warmer or cooler than the rest of the house can point to duct leaks, airflow problems, or system deficiencies.

Thermal imaging helps identify whether the issue is structural, an insulation gap, or a performance problem with the HVAC system itself, rather than guessing.
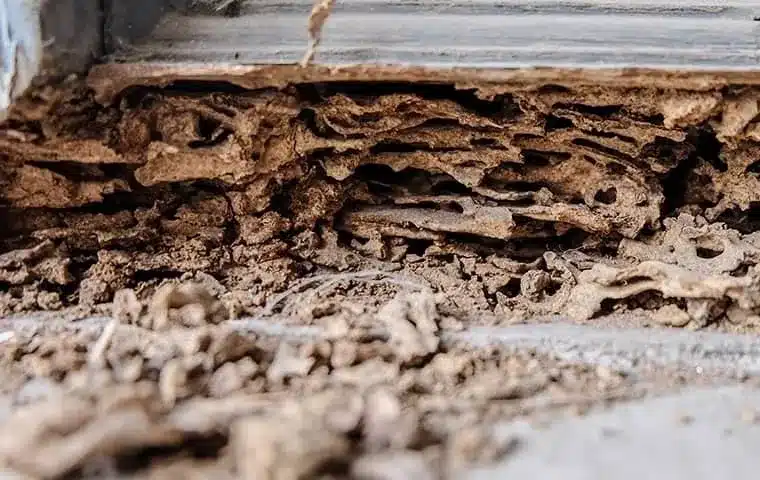
Pest Activity

While thermal imaging is not a substitute for a dedicated WDO inspection, warm-blooded pests like rodents can create detectable heat signatures inside walls and concealed spaces.

An experienced inspector may flag areas of unusual thermal activity that warrant further investigation for pest presence.

Roof and Ceiling Moisture

Roof leaks don’t always show up where you’d expect them. Water can travel along roof decking or framing before collecting in a different area entirely, making the entry point and the visible damage appear in completely separate locations.

Thermal imaging of ceilings can reveal moisture that has accumulated above a surface before it causes a visible stain or structural damage below.

What Thermal Imaging DetectsWhat It May Indicate
Cool, irregular spots on walls or ceilingsMoisture intrusion or hidden leak
Uneven heat distribution in walls or floorsMissing or compromised insulation
Hot spots in electrical panels or outletsOverloaded circuit or failing component
Temperature inconsistencies room to roomDuct leak or HVAC performance issue
Unexplained warm areas inside the wallsPossible pest activity
Moisture above ceiling surfaceRoof leak that hasn’t surfaced yet

What Thermal Imaging Cannot Do

Thermal imaging is a powerful tool, but it has real limitations worth understanding upfront.

It reads surface temperatures, but doesn’t see through walls, pinpoint the exact source of a leak, or confirm the presence of mold.

It detects anomalies that indicate a potential problem, not a definitive diagnosis. A thermal image finding always needs to be interpreted by a trained inspector who can put it in context with the rest of what they observed.

Conditions matter too. The most accurate results occur when there is a meaningful temperature difference between the interior and exterior of the home, typically at least 15 to 20 degrees Fahrenheit. On mild days, some anomalies may be less apparent.

This is why thermal imaging is most valuable as part of a full professional inspection, not a standalone service.

purpose of thermal imaging camera inspection

How Serenity Incorporates Thermal Imaging

At Serenity Home Inspections, infrared thermal imaging is included as part of our inspection packages, not an expensive add-on. Here’s a quick look at what every package includes:

  • Full residential inspection
  • Infrared thermal imaging
  • Visual mold inspection
  • Drone inspection
  • Complimentary home warranty
  • Concierge service

Whether you’re purchasing in Marietta, Alpharetta, Sandy Springs, or anywhere else in the greater Atlanta metro, thermal imaging means fewer surprises after closing.

For sellers, it can surface issues worth addressing before listing, helping avoid last-minute renegotiations on the buyer’s terms.

Related Questions

Is thermal imaging the same as a mold inspection?
No. Thermal imaging can detect moisture conditions where mold is likely to develop, but it does not identify or confirm mold itself. A dedicated mold and air quality test is the right next step when thermal imaging reveals significant moisture concerns.

Does thermal imaging apply to commercial properties?
Yes. It’s just as applicable to commercial inspections as residential ones, often more so given larger roof areas, more complex electrical systems, and greater potential for concealed moisture issues.

Can thermal imaging find issues a standard inspection would miss?
It can surface anomalies that aren’t visible during a standard visual inspection, particularly moisture behind walls, insulation gaps, and electrical hot spots. It works best as a complement to a thorough inspection, not a replacement for one.

What should I do if thermal imaging reveals a potential issue?
Your inspection report will note any thermal anomalies with context from the inspection. From there, the right specialist can evaluate the specific concern in more detail.

When to Call a Professional

If you’re buying a home in the Atlanta area, scheduling an inspection that includes infrared thermal imaging is one of the most effective ways to reduce your risk before closing.

Problems that are invisible during a walkthrough, such as active moisture intrusion, insulation gaps, or an electrical component running hotter than it should, are exactly what this technology is built to surface.

For sellers preparing to list, a pre-listing inspection with thermal imaging can identify concerns worth addressing on your own terms, before a buyer’s inspector finds them first.

Conclusion

An infrared thermal imaging camera doesn’t change what a home inspection is. It extends how far it can see. Moisture behind drywall, insulation gaps inside walls, electrical hot spots, roof leaks that haven’t surfaced yet: these are real problems that affect real purchase decisions, and a standard visual inspection can’t catch all of them.

At Serenity Home Inspections, thermal imaging is built into the process because Atlanta-area buyers and sellers deserve a complete picture of a home’s condition, not just the parts that are easy to see.

Ready to schedule? Reach out to the Serenity team today.

How Do I Test for Mold in My House and Prevent Growth?

Whether you’ve noticed a musty smell, seen visible growth, or experienced unexplained health symptoms, understanding when to test for mold and how it works gives you the information you need to protect your house and family.

Mold growing in your home creates health concerns and property damage that get worse the longer it goes unaddressed. Testing for mold helps you identify problems early and take action before mold spreads.

Atlanta’s humid climate creates ideal conditions for mold growth. Between summer humidity, afternoon thunderstorms, and occasional flooding, homes across metro Atlanta face constant moisture challenges.

Signs You Might Need to Test for Mold in the House

Mold doesn’t always announce itself with obvious visible growth. Many homeowners discover mold problems through indirect signs that indicate hidden growth behind walls, under floors, or in concealed spaces.

Common indicators of mold problems:

  • Musty odors that smell earthy, damp, or like rotting wood
  • Health symptoms, including respiratory issues, headaches, eye irritation, or allergy-like reactions that improve when you leave the house
  • Visible discoloration on walls, ceilings, or around windows
  • Water damage history from leaks, floods, or plumbing issues
  • Condensation regularly appearing on windows or walls
  • Peeling paint or wallpaper that bubbles or separates from the wall

Atlanta homes are particularly susceptible to mold in bathrooms, basements, attics, and crawl spaces where humidity accumulates. If you notice these signs, testing helps confirm whether mold is present and identifies the type and extent of contamination.

signs you need to test for mold in your indoor air

Visual Inspection Comes First

Before calling a professional for testing, conduct a thorough visual inspection of your home to locate obvious mold growth or moisture problems.

Check these high-risk areas:

  • Bathrooms: Around tubs, showers, under sinks, behind toilets
  • Kitchen: Under sinks, around dishwashers, behind refrigerators
  • Basements: On walls, around windows, near sump pumps
  • Attics: On roof decking, around vents, near insulation
  • Crawl spaces: On floor joists, subfloors, foundation walls
  • HVAC systems: Inside ductwork, on coils, in drain pans

Look for discoloration, fuzzy or slimy growth, water stains, and dampness. Mold appears in various colors, including black, green, white, orange, and brown.

Use a flashlight to inspect dark areas thoroughly. Pay attention to corners, seams, and anywhere two materials meet. Visual inspection identifies obvious problems and helps you decide whether professional testing is necessary.

DIY Mold Test Kits: What They Tell You

Hardware stores sell DIY mold test kits ranging from $10 to $50, but these kits have significant limitations that often leave homeowners with incomplete or misleading information.

Why DIY kits fall short:

  • Limited sampling: You’re guessing where to test instead of using systematic inspection protocols
  • No moisture detection: Kits don’t locate the water source causing mold growth
  • Inconsistent results: Air sampling varies wildly by time of day, weather, and air movement
  • No baseline comparison: You can’t tell if spore levels are elevated without outdoor samples
  • Species identification only: Knowing what type of mold you have doesn’t tell you concentration levels or health risks
  • No expert interpretation: Lab results arrive without guidance on what they mean or what actions to take

The biggest problem with DIY testing is that it doesn’t identify the moisture source. Without a professional’s assessment to find the water problem, mold keeps returning, no matter how many times you test or clean.

Professional Mold Testing Provides Comprehensive Results

Professional mold testing and air quality assessment deliver detailed, reliable information that DIY kits can’t match. Certified inspectors use calibrated equipment, proper sampling protocols, and accredited laboratories to analyze samples.

What professional testing includes:

  • Visual inspection of the entire property to locate moisture sources and visible mold
  • Moisture mapping using specialized meters to find hidden water problems
  • Thermal imaging to detect moisture behind walls, under floors, and in other concealed areas without invasive testing
  • Air sampling that captures airborne mold spore concentrations in multiple locations
  • Surface sampling from suspected mold growth areas for species identification
  • Lab analysis by accredited mycologists who identify mold types and concentration levels
  • Detailed report explaining findings, health risks, and remediation recommendations

Professional testing identifies not just whether mold is present, but what species, how much, where it’s concentrated, and what’s causing the moisture problem. This information guides effective remediation.

Thermal imaging technology is particularly valuable because it reveals temperature differences that indicate moisture intrusion you can’t see. Cold spots on walls often signal water problems that lead to mold growth. This non-invasive approach identifies issues without cutting into walls or ceilings.

Air quality testing compares indoor spore levels to outdoor baseline samples. Elevated indoor levels indicate active mold growth even when you can’t see it.

Understanding Your Mold Test Results

Mold test results include species identification and concentration levels in the house. Not all mold is equally problematic, so understanding what you’re dealing with helps you respond appropriately.

Common mold types found in homes:

Mold TypeWhere It GrowsHealth Concerns
CladosporiumSurfaces, fabrics, woodGenerally low risk, allergenic
PenicilliumWater-damaged materialsAllergenic, some species produce toxins
AspergillusDust, HVAC systems, insulationCan cause respiratory issues
Produces mycotoxins, a serious health riskWet cellulose materialsProduces mycotoxins, serious health risk
AlternariaDamp areas, showersCommon allergen

Concentration levels matter as much as species. Even benign molds cause problems at high concentrations. Professional reports compare your indoor levels to acceptable standards and outdoor baseline levels.

Results also identify moisture sources. Fixing the water problem is essential because, without addressing moisture, mold returns even after remediation.

Testing During Real Estate Transactions

Mold testing plays an important role when buying or selling Atlanta homes. Many buyers request mold inspections, especially for older homes or properties with a water damage history.

Sellers benefit from proactive mold testing before listing. Identifying and addressing mold problems upfront prevents inspection surprises that derail sales or lead to price reductions.

Buyers should consider mold testing when:

  • The home has a musty smell
  • There’s visible water damage or staining
  • The property has basement moisture or crawl space issues
  • Previous inspection reports mention moisture concerns
having a professional mold test helps prevent health issues and future growth

Professional mold assessment during the inspection period gives you leverage to negotiate repairs or credits. It also provides documentation of the home’s condition at purchase.

How to Prevent Mold Growth in Your Home

Once you’ve tested for and addressed existing mold, prevention strategies keep mold from returning. Most prevention focuses on controlling moisture since mold can’t grow without water.

Effective mold prevention:

  • Keep indoor humidity below 50% using dehumidifiers or AC
  • Run bathroom exhaust fans during and 30 minutes after showers
  • Vent dryers outside, not into attics or crawl spaces
  • Fix leaks immediately in roofs, plumbing, and around windows
  • Clean gutters and ensure proper drainage away from your foundation
  • Use mold-resistant products in bathrooms and basements

In Atlanta’s humid climate, whole-house dehumidification systems work better than portable units for maintaining healthy humidity levels year-round. Proper attic ventilation prevents moisture buildup that leads to roof deck mold.

Address any water intrusion within 24 to 48 hours. Mold starts growing quickly once materials get wet. A quick response to water problems prevents mold from establishing.

Related Questions

What’s the difference between mold inspection and mold testing?
Mold inspection involves visual assessment and moisture evaluation to locate problems. Mold testing includes lab analysis of samples to identify species and concentration levels. A comprehensive mold assessment includes both inspection and testing.

When should I schedule a home inspection?
Home inspections are essential when buying property, but current homeowners benefit from periodic inspections every few years or after significant weather events. Regular inspections identify developing problems with moisture, ventilation, and building systems before they cause serious damage.

What other environmental concerns should homeowners test for?
Beyond mold, homes may have radon, carbon monoxide, VOCs from building materials, or poor ventilation. Comprehensive air quality testing evaluates multiple factors that affect indoor environmental health.

When to Call Professionals

Mold problems require expertise for accurate assessment and safe remediation. Different professionals handle different aspects of mold issues.

Call a professional for mold and air quality testing when:

  • You suspect mold, but can’t locate the source
  • You need comprehensive testing to identify mold types and concentration levels
  • You’re buying or selling a home and want professional documentation
  • You’ve had water damage and want to verifythat mold hasn’t developed
  • You want thermal imaging to detect hidden moisture problems

Call a mold remediation specialist when:

  • Testing confirms mold that needs professional removal
  • You have mold growth larger than 10 square feet
  • Mold is in HVAC systems or behind walls

Serenity Home Inspection provides comprehensive mold and air quality testing throughout Atlanta and the surrounding areas.

Professional testing gives you reliable information about your home’s mold situation and indoor air quality so you can make informed decisions about remediation and prevention.

Conclusion

Testing for mold in your house starts with visual inspection and recognizing warning signs like musty odors or unexplained health symptoms.

Professional mold and air quality testing provides accurate, comprehensive results that DIY kits can’t deliver, identifying mold species, concentration levels, and moisture sources.

Contact Serenity Home Inspection for a thorough mold and air quality assessment that gives you the information you need to protect your property and family.

How a Strong Inspection Contingency Protects Homebuyers

Buying a home is one of the most significant financial moves you will ever make. Whether you are looking at a historic bungalow in Kirkwood or a modern build in Alpharetta, the process moves fast. Rule number one as a home buyer is that you should never overlook the inspection contingency.

In a competitive market, you might feel pressured to waive your rights just to get an offer accepted. But this clause is your primary safety net. At Serenity Home Inspection, we have protected over 12,000 families across the Atlanta area.

We know the due diligence period is stressful, but understanding your contract rights is the only way to protect your earnest money and your future.

The Role of the Inspection Contingency

In a Georgia real estate contract, the inspection contingency gives you a specific window of time to evaluate the property. This is commonly known as the Due Diligence Period.

During this time, you have the legal right to hire professionals to inspect every inch of the home. This clause is designed to put the power back in your hands. If your inspection report notes a major defect, you generally have three options.

  1. Request Repairs: Ask the seller to fix the problems before closing.
  2. Request a Credit: Ask the seller to reduce the price so you can handle repairs later.
  3. Walk Away: Cancel the contract entirely.

Protecting Your Earnest Money

If you cancel the contract within the agreed timeframe for any reason, you are legally entitled to get your earnest money back. This prevents you from being forced into a deal that no longer makes sense for your family.

Earnest Money is the deposit you provide when you make an offer to show the seller you are a serious buyer.

It is usually held in an escrow account. If you back out of a deal without a valid contingency, the seller might be able to keep that money. A strong inspection contingency ensures that if the house is a “lemon,” you can walk away with your deposit intact.

understanding the inspection contingency

Why Timing is Everything

In the Atlanta market, due diligence periods are often short. It is common to see windows of only five to seven days. You have to move fast.

Once that clock runs out, your ability to negotiate for repairs or exit the contract without losing your deposit disappears.

  • Schedule Early: Contact Serenity Home Inspection the moment you go under contract.
  • Review Fast: We provide same-day or next-day reports, so you have time to digest the facts.
  • Negotiate Hard: Use the remaining days of your contingency to get repair quotes or second opinions.

Strengthen Your Contingency With Specialized Testing

A standard home inspection is a great start, but it is primarily a visual check. To truly protect your investment, you should look for specific Georgia risks that hide beneath the surface.

At Serenity Home Inspection, we use specialized services as diagnostic tools to uncover what the eyes cannot see. These results provide the hard data needed to win a negotiation.

Sewer Scope Inspections

Many older Atlanta neighborhoods still have clay or cast-iron sewer lines. Tree roots love to break into these pipes. A standard inspection only checks if the toilets flush. It does not check the health of the underground pipe.

  • The Risk: A collapsed sewer line can cost 10,000 dollars or more to replace.
  • The Strategy: A sewer scope inspection identifies these breaks before you own them. Finding this during the due diligence window allows you to make the seller foot the bill before your contingency expires.

Radon and Air Quality Testing

Atlanta soil contains uranium that naturally decays into radon gas. This odorless, radioactive gas is a serious health concern in North Georgia.

Radon and moisture often enter through the same foundation gaps, so a high radon reading is often a leading indicator for air quality issues.

  • Where it hides: Basements and crawl spaces.
  • The Strategy: Include radon testing in your contingency. Pairing this with mold and air quality testing verifies if the home’s “envelope” is sealed. If we find elevated levels, you use your contingency to negotiate for a mitigation system or professional remediation.

Investor Property Review

For those looking at rental opportunities in Metro Atlanta, an investor property review helps you quantify “hidden” costs.

  • Deferred Maintenance: We find the structural or mechanical issues that could eat your margins.
  • Strategic Value: This data is essential for re-negotiating the purchase price during the contingency window to ensure the numbers still work for your portfolio.

Common Misconceptions About Inspection Rights

Many buyers get bad advice during the search process. Here are the facts for the Georgia market.

As-Is Sales

Even if a home is sold as-is, you should still keep your inspection contingency. You need to know what you are getting into. If the repair costs are more than you can handle, you can still cancel the contract.

The term “as-is” usually means the seller will not make repairs, but it does not mean you have to skip the inspection.

Appraisals vs. Inspections

An appraiser works for the bank to check the value of the home. A home inspector works for you to check the safety and condition of the home. You need both to be fully protected.

An appraisal will not tell you if there is mold in the crawl space or if the sewer line is collapsed.

New Construction

Never skip an inspection on a new home. We frequently find missing insulation, reversed wiring, and plumbing leaks in brand-new houses. A strong contingency allows you to get these items fixed by the builder before you move in.

What if the Report Finds Defects?

Most homes have defects. The goal of the inspection contingency is not to find a perfect house. It is to avoid deal breakers. When the report shows significant issues, you and your agent will create a negotiation plan.

The Negotiation Process

  1. Review the Report: Look for structural, safety, or high-cost items.
  2. Draft a Repair Amendment: Your agent will list the items you want the seller to address.
  3. Hold Your Ground: If the seller refuses to fix a major safety issue, your contingency allows you to walk away safely.
inspection contingency importance stat

The Final Walkthrough: Your Last Safety Check

The final walkthrough is the closing act of your inspection contingency. This is your last chance to verify that the seller fulfilled their end of the Repair Amendment before you sign the final papers.

  • Verify the Work: Bring your inspection report to confirm that the agreed-upon repairs were completed by licensed professionals. If the seller was supposed to fix the electrical panel, check for the invoice, and perform the physical repair.
  • Confirm Condition: Ensure no new damage occurred during the seller’s move-out process. It is common for movers to ding walls or scratch floors.
  • Final Leverage: This is the moment you confirm you are getting the exact value you negotiated for during the due diligence period. If the repairs are not done, you can often delay the closing until they are finished.

Common Questions to Explore

Can I cancel for any reason during due diligence?
In most standard Georgia contracts, yes. The due diligence period is a “making sure” period. If you decide the house is not right for you, whether it’s due to something from your report or a non-repair reason, you can usually terminate within the timeframe.

What if the seller will not fix anything?
The seller is not required to fix anything. However, the inspection contingency gives you the leverage. If they will not budge on a major repair, you have the right to keep your earnest money and find a different house.

How do I know if I need a Sewer Scope?
If the home was built before 1990 or has large trees near the sewer line, we highly recommend it. It is the only way to verify the condition of the underground plumbing before you own it.

When to Contact Serenity Home Inspection

You should have an inspector ready before you even make an offer. In the fast-moving Atlanta market, timing is your best friend. Reach out to us if you are in any of the following situations.

  • First Time Homebuyers: We will walk you through the home and explain how everything works. We help you understand which items are safety issues and which are simple maintenance.
  • Investor Property Review: If you are an investor, you need to know your exact repair costs to calculate your return. Our review helps you identify deferred maintenance that could eat your profits.
  • Buying a Historic Atlanta Home: Houses in areas like Grant Park or Virginia Highland have great character but unique problems. We know what to look for in aging electrical or plumbing systems.
  • Relocating to Georgia: We understand the local soil and humidity issues that out-of-state buyers might miss. We help you navigate the specific building codes found in Metro Atlanta.

Conclusion

The inspection contingency is the most powerful tool an Atlanta buyer has. It gives you the time to verify the home condition and negotiate from a position of strength.

By using this period for a thorough general inspection and specialized tests like sewer scopes and radon checks, you protect your family and your wallet.

At Serenity Home Inspection, our goal is to provide the clarity you need to move forward. Our easy-to-read reports and 5-star service have made us a trusted partner for thousands of Atlanta residents.

How to Read and Understand Home Inspection Reports Easily

Home inspection reports are meant to bring clarity to the home-buying or selling process. Instead, many people open their report and feel overwhelmed by the length, the terminology, and the number of findings listed on the page.

This reaction is common and understandable. A professional home inspection report documents a large amount of information, even when a home is generally in good condition.

Without knowing how the report is structured or how inspectors prioritize findings, it can be difficult to tell what actually matters.

Once you know how to approach the report, it becomes a practical tool that helps you make informed decisions rather than a document that creates unnecessary stress.

What a Home Inspection Report Is Designed to Do

A home inspection report documents the visible condition of a property at the time of the inspection. Inspectors evaluate accessible areas of the home and report on what they can observe and test under normal conditions.

The report aims to help buyers, sellers, and property owners understand the current condition of major systems and components.

A home inspection report intends to:

  • Identify safety concerns that may pose a risk
  • Highlight defects that affect function or performance
  • Document visible damage, deterioration, or improper installation
  • Provide context for future maintenance and planning

It is important to understand what the report is not designed to do. Inspection reports do not predict future failures, provide repair estimates, or guarantee that a home is free of defects.

They reflect conditions observed on a specific day, not what may happen months or years later. Understanding this purpose helps set realistic expectations before reviewing individual findings.

Why it's important to understand inspection reports

Why Home Inspection Reports Can Feel Overwhelming

Many people are surprised by how long an inspection report can be. A report may include dozens of pages, hundreds of photos, and notes on every major system in the home.

This does not mean the home is in poor condition.

Inspection reports are detailed because inspectors document everything they observe, not just major problems. Minor maintenance items, normal wear, and informational notes are included alongside more serious findings.

Reports often feel overwhelming because:

  • Minor and major issues are listed together
  • Photos highlight specific conditions without showing the full context
  • Technical language is used for accuracy, not alarm
  • Buyers may be seeing these systems for the first time

Learning how to prioritize information is key to reading the report effectively.

How Home Inspection Reports Are Organized

Most inspection reports follow a system-based structure. Inspectors review each major area of the home separately so readers can focus on one system at a time.

Common sections include:

  • Roofing and exterior components
  • Structural elements and foundation
  • Electrical systems
  • Plumbing systems
  • Heating and cooling systems
  • Attic, insulation, and ventilation
  • Interior components such as walls, ceilings, doors, and windows

Within each section, findings are listed individually with descriptions and photos. Reading the report section by section, rather than jumping around, helps prevent confusion and information overload.

Understanding Severity Levels and Categories

Inspection reports often categorize findings to help readers understand priority and significance. These categories are meant to guide attention, not to suggest that everything listed requires immediate action.

While wording varies by company, findings typically fall into a few broad groups.

CategoryWhat It Means
Safety ConcernA condition that could pose a risk to occupants
Major DefectAn issue affecting function or performance
Minor DefectAn item that should be addressed but is not urgent
Maintenance ItemRoutine upkeep or preventative care
Informational NoteGeneral observations or context

Not every item carries the same weight. A safety concern or major defect usually deserves attention before maintenance or informational notes.

Understanding these categories helps readers focus on what matters most.

How to Interpret Photos in Inspection Reports

Photos are included to document conditions observed during the inspection. They are not meant to represent the entire home or to exaggerate issues.

Photos often show:

  • Close-up views of specific defects
  • Limited angles due to access restrictions
  • Conditions that appear more dramatic when zoomed in

A photo without context can be misleading. Always read the written explanation that accompanies the image. The description explains why the photo is there and how serious the issue may be.

Sections Buyers Should Review Carefully

While every section of the report has value, certain systems tend to have a greater impact on safety, long-term costs, and insurability.

Buyers often benefit from paying close attention to:

  • Roofing and drainage systems
  • Foundation and structural components
  • Electrical safety issues
  • Plumbing leaks or water-related concerns
  • Heating and cooling performance

Issues in these areas are more likely to influence repair planning or negotiation decisions.

Age, Wear, and What Is Normal

One of the most common misunderstandings in inspection reports is the difference between age-related wear and an actual defect.

Homes age over time. Components naturally wear, even when properly maintained.

For example:

  • An older roof may show wear without active leaks
  • An aging HVAC system may still function properly
  • Older electrical components may not meet modern standards

Age alone does not necessarily mean a component is defective. Inspectors note age-related conditions to provide context and help homeowners plan for future maintenance or replacement.

Why Inspectors Recommend Further Evaluation

Inspection reports often include recommendations for further evaluation by licensed specialists. This does not automatically mean something is wrong.

Your inspector may recommend further evaluation when:

  • There’s limited access to a component
  • The home needs specialty tools or testing
  • Conditions cannot be fully confirmed during a visual inspection

This recommendation helps protect the buyer by ensuring that complex systems receive appropriate review when needed.

what to understand in inspection reports

How Inspection Reports Are Used in Real Estate Transactions

Inspection reports play different roles depending on the situation.

Reports help buyers:

  • Understand the true condition of the home
  • Identify items to monitor or repair
  • Plan future maintenance

For sellers, reports can:

  • Highlight issues to address before listing
  • Reduce surprises during buyer inspections
  • Support smoother transactions

When it comes to property investments, reports provide insight into long-term maintenance needs and potential risks.

Common Misconceptions About Inspection Reports

Many misunderstandings stem from assumptions about what inspection findings mean.

Some common misconceptions include:

  • Every item in the report must be repaired
  • A long report means the home is in bad condition
  • Older homes are always problematic
  • Inspectors are listing cosmetic issues only

In reality, inspection reports are designed to inform, not to judge or condemn a property.

Related Questions to Explore

Why do inspection reports include so many minor items?
The inspector will note minor items to provide a complete picture of the home and help with future maintenance planning.

Should sellers fix everything in the report?
Not necessarily. Many items are informational or related to normal wear.

Can buyers use the report for future maintenance planning?
Yes. Inspection reports often serve as a long-term reference for homeowners.

When to Ask Questions About Your Report

Inspection reports are for reading, reviewing, and discussion. If something is unclear, it is appropriate to ask questions.

Buyers and sellers may want clarification when:

  • The severity of an issue is unclear
  • A recommendation is unfamiliar
  • A system is near the end of its typical service life

Clear communication helps ensure the report is as valuable to you as possible.

Conclusion

Home inspection reports include lots of details by design. They document the visible condition of a home so buyers and sellers can make informed decisions.

Understanding how to read and interpret the report allows you to focus on what truly matters, avoid unnecessary worry, and plan responsibly for the future.

Serenity Home Inspections provides clear, thorough inspection reports to educate and inform, not overwhelm.

Why a Home Inspection Is Still Essential on a New Build

A home inspection on a new build is not about assuming something was done wrong, but homes are complex systems, and even high-quality construction can include oversights, rushed installations, or components that do not function as expected once the home is lived in.

Many buyers assume that inspections are mainly for older homes with years of wear and tear, but new homes can still have issues that are just as important to catch early.

For buyers and homeowners in the Atlanta area, a professional inspection provides clarity at key moments, such as before closing or before a builder’s warranty expires. It gives you an unbiased, documented look at the home so you can move forward with confidence.

What a Home Inspection on a New Build Really Covers

Buying a new construction home often comes with a sense of relief. Everything is new, unused, and freshly installed. A home inspection on your new build is how you protect your investment.

It’s a comprehensive evaluation of the home’s visible and accessible systems and components that focuses on how those systems are installed and how they function under normal operating conditions.

During a new construction inspection, your inspector typically evaluates:

  • Foundation and visible structural components
  • Roof coverings, flashing, and attic conditions
  • Heating and cooling systems and airflow
  • Electrical systems and safety protections
  • Plumbing systems, fixtures, and drainage
  • Insulation and ventilation
  • Exterior grading and moisture management

Each of these areas plays a role in how the home performs over time. Even small inconsistencies in installation can affect comfort, efficiency, and durability once the home is occupied.

Inspectors do not perform code enforcement inspections. Instead, they evaluate homes based on professional standards of practice, manufacturer installation guidelines, and local building requirements where applicable.

new construction inspection stat

The goal is to identify conditions that may impact safety, performance, or long-term reliability so homeowners understand what they are responsible for moving forward.

According to the National Association of Home Builders, many construction-related issues are not discovered until after homeowners move in and begin using systems daily. This is why inspections remain valuable even when a home is brand new.

Why New Homes Can Still Have Problems

New construction homes are built on tight schedules using many subcontractors. Even with experienced builders, coordination challenges and time pressure can lead to small but important issues.

Common reasons problems appear after move-in include:

  • Materials settling, as the home adjusts to soil conditions
  • Drainage patterns becoming clear after heavy rain
  • HVAC systems operating through seasonal temperature swings
  • Plumbing and electrical systems being used daily for the first time

These are normal realities of construction. A home may pass a final walkthrough but still develop performance issues once it experiences real-world conditions.

An inspection helps document how the home responds to those conditions rather than relying on assumptions made during the build.

Builder Walkthroughs Versus Independent Inspections

Builder walkthroughs serve a purpose, but they are not designed to replace a professional inspection. Walkthroughs usually focus on cosmetic items such as paint touch-ups, trim alignment, and visible finish quality.

A professional inspection focuses on the function and performance of the system. Inspectors evaluate how systems are installed, how they operate together, and whether conditions could lead to future problems.

This includes areas that are rarely discussed during walkthroughs, such as attic ventilation balance, drainage slopes, moisture control, and electrical safety protections.

The difference is not about blame. It is about perspective. Inspectors are independent and focused on homeowner education rather than project completion.

When a New Build Inspection Is Most Valuable

New build inspections provide value at several important stages.

Before closing

A pre-closing inspection allows buyers to document concerns before final paperwork is signed. This creates a clear record of the home’s condition at move-in and helps prevent disputes about when an issue first appeared.

After move-in but within the warranty period

Many builder warranties cover workmanship and systems for a limited time. An inspection during this window helps identify issues that may qualify for correction while coverage still applies.

Near the end of the first year

An inspection around the 11th month is common because it allows homeowners to document concerns before warranty deadlines expire.

By this point, the home has experienced seasonal changes and regular use, making performance issues easier to spot.

Each stage helps homeowners protect their investment in a different way.

Common Findings in New Construction Homes

Even well-built homes can have minor deficiencies that are easy to miss without training. These issues may not feel urgent at first, but they can affect comfort, efficiency, and durability over time.

Common findings include:

  • Incomplete or inconsistent caulking around windows and doors
  • Insulation gaps that reduce energy efficiency
  • HVAC airflow imbalances between rooms
  • Drainage patterns that direct water toward the foundation
  • Missing or improperly installed safety protections

Moisture-related concerns, insulation issues, and HVAC performance observations are among the most frequently noted findings in both new and existing homes.

common finding during inspection on a new build home

Catching these early helps prevent more serious damage later and gives homeowners a clearer understanding of what to monitor.

New Build Assumptions Versus Inspection Reality

Common New Build AssumptionWhat Inspections Often Reveal
Everything meets expectationsSome components function but need adjustment
Water drainage is not a concernGrading issues may appear after rainfall
HVAC systems are fully balancedAirflow differences between rooms are common
Electrical systems are completeSafety protections may be missing or inconsistent
New means maintenance-freeEarly adjustments and monitoring are still needed

This table helps explain why inspections add value even when a home looks finished and well-built. Appearance alone does not reflect how a home will perform over time.

Why Small Issues Matter Over Time

Minor issues often feel easy to ignore, especially in a new home. However, small problems tend to grow when left unaddressed.

For example:

  • Poor drainage can contribute to moisture intrusion
  • Insulation gaps can increase energy costs
  • Improper ventilation can affect indoor air quality
  • HVAC strain can shorten equipment lifespan

Research from the International Code Council shows that moisture management problems are one of the leading contributors to long-term building damage. Identifying contributing factors early helps protect both the structure and the living environment.

How Inspections Support Builder Warranty Use

Builder warranties typically include coverage for workmanship, materials, and systems for limited periods. They also require issues to be reported within specific timeframes.

An inspection report provides:

  • Clear written descriptions of observed conditions
  • Photos that show location and context
  • Documentation that concerns existed within the warranty window

This documentation helps homeowners communicate clearly and reduces misunderstandings about timing or responsibility. It also helps homeowners prioritize which issues should be addressed first.

Why Atlanta-Area Homes Benefit Specifically

Atlanta’s climate and soil conditions create unique challenges for homes. Hot summers, heavy rainfall, and clay-rich soils all influence how homes settle and perform.

Inspections in this area often pay close attention to:

  • Drainage and grading after rain events
  • Attic ventilation and heat buildup
  • HVAC sizing and airflow in warm climates
  • Moisture control around foundations

Local experience matters. An inspection informed by regional conditions provides insight that generic walkthroughs often miss, especially in new developments where soil disturbance is common.

Other Questions Buyers Often Ask About New Build Inspections

Is a New Construction Inspection Different From a Pre-Drywall Inspection?
Yes. A pre-drywall inspection focuses on structural framing, plumbing, and electrical components before walls are closed. A completed new construction inspection evaluates how finished systems perform once the home is ready for occupancy.

Many buyers use both to get a clearer picture at different stages.

Do Homes Built Recently Still Need a Standard Home Inspection?
They can. A standard home inspection looks at overall condition and performance, regardless of age. Even newer homes can benefit from this type of inspection once systems have been in use for a period of time.

Can an Inspection Help Me Understand Maintenance Priorities?
Inspection reports often point out areas that may need monitoring or routine upkeep, even if no immediate repair is required. This helps homeowners understand where future maintenance is most likely to matter.

When to Call an Inspector

Calling a professional home inspector makes sense when you want an unbiased, thorough evaluation of your new build.

You should consider scheduling an inspection if:

  • You are purchasing a new construction home
  • You want documentation before closing
  • You are within the builder’s warranty period
  • You are approaching the end of the first year
  • You want to understand how systems are performing after real use

A professional inspection provides education, documentation, and clarity. It does not involve repairs or enforcement. Its value lies in helping homeowners understand the home they are responsible for.

Serenity Home Inspection provides professional home inspections and new construction inspections for buyers and homeowners throughout the Atlanta area.

Conclusion

New construction homes offer many benefits, but new does not mean flawless. A home inspection is still essential because it verifies performance, documents concerns, and helps homeowners make informed decisions while options are still available.

For Atlanta buyers, a new construction inspection is a practical step that protects your investment and provides confidence in your home both now and in the years ahead. Book yours today with Serenity Home Inspections.

Tips for buying a home with a septic tank

Are you in the market for a new home? Perhaps you’ve found the perfect place, but there’s one detail giving you pause – it has a septic tank. While septic systems may seem daunting to those accustomed to municipal sewer systems, they’re a common feature in rural and suburban areas. Buying a house with a septic tank can be a smart decision, but it’s essential to understand what you’re getting into. Here are some crucial things to consider:

Understand the Basics of Septic Systems

Before diving into purchasing a home with a septic tank, it’s vital to understand how these systems work. Unlike sewer systems that transport wastewater to a centralized treatment facility, septic tanks treat and dispose of wastewater on-site. Wastewater from the house flows into the tank, where solids settle at the bottom and bacteria break down organic matter. The clarified liquid then exits the tank and is dispersed into a drain field, where it further percolates through the soil.

Inspect and Assess the Septic System

During the home inspection process, make sure to thoroughly evaluate the condition of the septic system. Hire a qualified inspector who specializes in septic systems to assess the tank, drain field, and related components. They can identify any existing issues or potential problems that may require attention or repair. Understanding the system’s age, capacity, and maintenance history is crucial for making an informed decision.

Factor in Maintenance and Upkeep

Owning a home with a septic tank comes with ongoing maintenance responsibilities. Regular pumping and inspection of the tank are necessary to prevent backups, odors, and system failures. Educate yourself about proper usage habits, such as conserving water, avoiding flushing non-biodegradable items, and refraining from pouring harsh chemicals down the drain. Establish a maintenance schedule and budget for servicing the septic system to ensure its longevity and optimal performance.

Familiarize Yourself with Local Regulations

Septic system regulations vary by location, so it’s essential to research and comply with local ordinances and guidelines. Determine if any permits or certifications are required for installing, repairing, or replacing a septic system. Additionally, familiarize yourself with setback requirements, property line considerations, and environmental regulations that may impact the placement and maintenance of the septic tank and drain field.

Budget for Potential Repairs or Replacements

While a well-maintained septic system can last for decades, unforeseen issues may arise that require repair or replacement. Factor in the potential costs of repairing or upgrading the septic system when budgeting for homeownership expenses. Consider investing in a home warranty or septic system insurance policy to provide financial protection against unexpected repairs or failures.

Seek Guidance from Professionals

Navigating the complexities of buying a house with a septic tank can be overwhelming, so don’t hesitate to seek guidance from professionals. Consult with experienced real estate agents, septic system inspectors, and contractors who can provide valuable insights and advice. They can help you make informed decisions, negotiate contingencies, and ensure a smooth transition into homeownership with a septic system.

Final Thoughts

Buying a house with a septic tank can offer the allure of rural living and independence from municipal services. However, it’s essential to approach the process with careful consideration and awareness of the unique responsibilities and challenges that come with septic system ownership. By understanding the basics, conducting thorough inspections, adhering to maintenance protocols, and seeking professional guidance, you can confidently invest in a home with a septic tank and enjoy years of reliable wastewater management.

What is a Termite Letter?

You might hear termite letters also referred to as the Official Georgia Wood Infestation Inspection Report.

If you are a part of the real estate transaction process, whether you are a buyer or seller, it is highly recommended to have your home inspected for wood destroying organisms or WDO, which Serenity Home Inspections offers as an add on service to your home inspection. 

Our patterning pest control company will provide you with a termite clearance letter stating that the property has been inspected for wood destroying organisms. This includes conditions conducive to infestation, as well as other wood destroying insects such as powder post beetles, wood borers, wood decay fungus and drywood termites,  This letter may be required by mortgage or loan companies.

These letters should be read carefully after they are received because they could state that there is not a current termite problem, but there might be prior termite damage that was untreated or uncorrected. If this is found, it is important for the buyer and seller to negotiate who is to be responsible for repairing this damage.

Termite damage is very serious and can cause your home to have detrimental structural falters, and expensive repairs. If termites activity is found or suspected it should be inspected and treated immediately.

What’s Included In Your Home Inspection?

Buying a house is an exciting process. You get to move into your dream home and start the next chapter of your life. But before you can buy a house, you need to make sure that it’s a sound investment and safe for you and your family. That means getting a home inspection from a professional like Serenity Home Inspections. The inspection process is governed by the InterNACHI (International Association of Certified Home Inspectors) standards of practice listed below.

1. Definitions and Scope

1.1.  A home inspection is a non-invasive, visual examination of the accessible areas of a residential property (as delineated below), performed for a fee, which is designed to identify defects within specific systems and components defined by these Standards of practice that are both observed and deemed material by the inspector.  The scope of work may be modified by the Client and Inspector prior to the inspection process.

  1. The home inspection is based on the observations made on the date of the inspection, and not a prediction of future conditions.
  2. The home inspection will not reveal every issue that exists or ever could exist, but only those material defects observed on the date of the inspection.

1.2.  A material defect is a specific issue with a system or component of a residential property that may have a significant, adverse impact on the value of the property, or that poses an unreasonable risk to people.  The fact that a system or component is near, at, or beyond the end of its normal, useful life is not, in itself, a material defect.

1.3.  A home inspection report shall identify, in written format, defects within specific systems and components defined by these Standards that are both observed and deemed material by the inspector.  Inspection reports may include additional comments and recommendations.

2. Limitations, Exceptions & Exclusions

2.1 Limitations:

  1. An inspection is not technically exhaustive.
  2. An inspection will not identify concealed or latent defects. 
  3. An inspection will not deal with aesthetic concerns or what could be deemed matters of taste, cosmetic defects, etc. 
  4. An inspection will not determine the suitability of the property for any use. 
  5. An inspection does not determine the market value of the property or its marketability.
  6. An inspection does not determine the insurability of the property. 
  7. An inspection does not determine the advisability or inadvisability of the purchase of the inspected property. 
  8. An inspection does not determine the life expectancy of the property or any components or systems therein. 
  9. An inspection does not include items not permanently installed. 
  10. This Standards of Practice applies to properties with four or fewer residential units and their attached garages and carports.

2.2 Exclusions:

I. The inspector is not required to determine:

  1. property boundary lines or encroachments.
  2. the condition of any component or system that is not readily accessible. 
  3. the service life expectancy of any component or system. 
  4. the size, capacity, BTU, performance or efficiency of any component or system. 
  5. the cause or reason of any condition. 
  6. the cause for the need of correction, repair or replacement of any system or component. 
  7. future conditions. 
  8. compliance with codes or regulations. 
  9. the presence of evidence of rodents, birds, bats, animals, insects, or other pests. 
  10. the presence of mold, mildew or fungus.
  11. the presence of airborne hazards, including radon. 
  12. the air quality. 
  13. the existence of environmental hazards, including lead paint, asbestos or toxic drywall.
  14. the existence of electromagnetic fields. 
  15. any hazardous waste conditions. 
  16. any manufacturers’ recalls or conformance with manufacturer installation, or any information included for consumer protection purposes.
  17. acoustical properties.
  18. correction, replacement or repair cost estimates. 
  19. estimates of the cost to operate any given system.

II. The inspector is not required to operate:

  1. any system that is shut down.
  2. any system that does not function properly. 
  3. or evaluate low-voltage electrical systems, such as, but not limited to:
    1. phone lines;
    2. cable lines;
    3. satellite dishes;
    4. antennae;
    5. lights; or
    6. remote controls.
  4. any system that does not turn on with the use of normal operating controls. 
  5. any shut-off valves or manual stop valves. 
  6. any electrical disconnect or over-current protection devices. 
  7. any alarm systems. 
  8. moisture meters, gas detectors or similar equipment.

III. The inspector is not required to:

  1. move any personal items or other obstructions, such as, but not limited to:  throw rugs, carpeting, wall coverings, furniture, ceiling tiles, window coverings, equipment, plants, ice, debris, snow, water, dirt, pets, or anything else that might restrict the visual inspection.
  2. dismantle, open or uncover any system or component.
  3. enter or access any area that may, in the inspector’s opinion, be unsafe. 
  4. enter crawlspaces or other areas that may be unsafe or not readily accessible. 
  5. inspect underground items, such as, but not limited to: lawn-irrigation systems, or underground storage tanks (or indications of their presence), whether abandoned or actively used. 
  6. do anything that may, in the inspector’s opinion, be unsafe or dangerous to the inspector or others, or damage property, such as, but not limited to:  walking on roof surfaces, climbing ladders, entering attic spaces, or negotiating with pets. 
  7. inspect decorative items. 
  8. inspect common elements or areas in multi-unit housing. 
  9. inspect intercoms, speaker systems or security systems.
  10. offer guarantees or warranties. 
  11. offer or perform any engineering services. 
  12. offer or perform any trade or professional service other than a home inspection. 
  13. research the history of the property, or report on its potential for alteration, modification, extendibility or suitability for a specific or proposed use for occupancy. 
  14. determine the age of construction or installation of any system, structure or component of a building, or differentiate between original construction and subsequent additions, improvements, renovations or replacements. 
  15. determine the insurability of a property.
  16. perform or offer Phase 1 or environmental audits.
  17. inspect any system or component that is not included in these Standards.

3. Standards of

Practice:

3.1 Roof 

I. The inspector shall inspect from ground level or the eaves:

  1. the roof-covering materials;
  2. the gutters;
  3. the downspouts;
  4. the vents, flashing, skylights, chimney, and other roof penetrations; and 
  5. the general structure of the roof from the readily accessible panels, doors or stairs.

II. The inspector shall describe:

A. the type of roof-covering materials.III. The inspector shall report as in need of correction:

   A. observed indications of active roof leaks.

IV. The inspector is not required to:

  1. walk on any roof surface.
  2. predict the service life expectancy. 
  3. inspect underground downspout diverter drainage pipes. 
  4. remove snow, ice, debris or other conditions that prohibit the observation of the roof surfaces.
  5. move insulation. 
  6. inspect antennae, satellite dishes, lightning arresters, de-icing equipment, or similar attachments.
  7. walk on any roof areas that appear, in the inspector’s opinion, to be unsafe.
  8. walk on any roof areas if doing so might, in the inspector’s opinion, cause damage. 
  9. perform a water test.
  10. warrant or certify the roof.
  11. confirm proper fastening or installation of any roof-covering material.

3.2 Exterior 

I. The inspector shall inspect:

  1. the exterior wall-covering materials; 
  2. the eaves, soffits and fascia;
  3. a representative number of windows;
  4. all exterior doors;
  5. flashing and trim;
  6. adjacent walkways and driveways;
  7. stairs, steps, stoops, stairways and ramps;
  8. porches, patios, decks, balconies and carports;
  9. railings, guards and handrails; and 
  10. vegetation, surface drainage, retaining walls and grading of the property, where they may adversely affect the structure due to moisture intrusion. 

II. The inspector shall describe:

  1. the type of exterior wall-covering materials.

III. The inspector shall report as in need of correction:

  1. any improper spacing between intermediate balusters, spindles and rails.

IV. The inspector is not required to:

  1. inspect or operate screens, storm windows, shutters, awnings, fences, outbuildings, or exterior accent lighting.
  2. inspect items that are not visible or readily accessible from the ground, including window and door flashing. 
  3. inspect or identify geological, geotechnical, hydrological or soil conditions. 
  4. inspect recreational facilities or playground equipment. 
  5. inspect seawalls, breakwalls or docks. 
  6. inspect erosion-control or earth-stabilization measures. 
  7. inspect for safety-type glass. 
  8. inspect underground utilities. 
  9. inspect underground items. 
  10. inspect wells or springs. 
  11. inspect solar, wind or geothermal systems. 
  12. inspect swimming pools or spas. 
  13. inspect wastewater treatment systems, septic systems or cesspools. 
  14. inspect irrigation or sprinkler systems. 
  15. inspect drain fields or dry wells. 
  16. determine the integrity of multiple-pane window glazing or thermal window seals.

3.3 Basement, Foundation, Crawlspace & Structure

I. The inspector shall inspect:

  1. the foundation;
  2. the basement;
  3. the crawlspace; and
  4. structural components.

II. The inspector shall describe:

  1. the type of foundation; and
  2. the location of the access to the under-floor space.

III. The inspector shall report as in need of correction:

  1. observed indications of wood in contact with or near soil;
  2. observed indications of active water penetration; 
  3. observed indications of possible foundation movement, such as sheetrock cracks, brick cracks, out-of-square door frames, and unlevel floors; and
  4. any observed cutting, notching and boring of framing members that may, in the inspector’s opinion, present a structural or safety concern.

IV. The inspector is not required to:

  1. enter any crawlspace that is not readily accessible, or where entry could cause damage or pose a hazard to the inspector.
  2. move stored items or debris. 
  3. operate sump pumps with inaccessible floats. 
  4. identify the size, spacing, span or location or determine the adequacy of foundation bolting, bracing, joists, joist spans or support systems. 
  5. provide any engineering or architectural service. 
  6. report on the adequacy of any structural system or component.

3.4 Heating 

I. The inspector shall inspect:

  1. the heating system, using normal operating controls.

II. The inspector shall describe:

  1. the location of the thermostat for the heating system;
  2. the energy source; and
  3. the heating method.

III. The inspector shall report as in need of correction:

  1. any heating system that did not operate; and
  2. if the heating system was deemed inaccessible.

IV. The inspector is not required to:

  1. inspect, measure, or evaluate the interior of flues or chimneys, fire chambers, heat exchangers, combustion air systems, fresh-air intakes, makeup air, humidifiers, dehumidifiers, electronic air filters, geothermal systems, or solar heating systems.
  2. inspect fuel tanks or underground or concealed fuel supply systems. 
  3. determine the uniformity, temperature, flow, balance, distribution, size, capacity, BTU, or supply adequacy of the heating system. 
  4. light or ignite pilot flames. 
  5. activate heating, heat pump systems, or other heating systems when ambient temperatures or other circumstances are not conducive to safe operation or may damage the equipment. 
  6. override electronic thermostats. 
  7. evaluate fuel quality.
  8. verify thermostat calibration, heat anticipation, or automatic setbacks, timers, programs or clocks.
  9. measure or calculate the air for combustion, ventilation, or dilution of flue gases for appliances.

3.5 Cooling 

I. The inspector shall inspect:

  1. the cooling system, using normal operating controls.

II. The inspector shall describe:

  1. the location of the thermostat for the cooling system; and
  2. the cooling method.

III. The inspector shall report as in need of correction:

  1. any cooling system that did not operate; and
  2. if the cooling system was deemed inaccessible.

IV. The inspector is not required to:

  1. determine the uniformity, temperature, flow, balance, distribution, size, capacity, BTU, or supply adequacy of the cooling system.
  2. inspect portable window units, through-wall units, or electronic air filters. 
  3. operate equipment or systems if the exterior temperature is below 65° Fahrenheit, or when other circumstances are not conducive to safe operation or may damage the equipment. 
  4. inspect or determine thermostat calibration, cooling anticipation, or automatic setbacks or clocks. 
  5. examine electrical current, coolant fluids or gases, or coolant leakage. 

3.6 Plumbing

I. The inspector shall inspect:

  1. the main water supply shut-off valve;
  2. the main fuel supply shut-off valve;
  3. the water heating equipment, including the energy source, venting connections, temperature/pressure-relief (TPR) valves, Watts 210 valves, and seismic bracing;
  4. interior water supply, including all fixtures and faucets, by running the water;
  5. all toilets for proper operation by flushing;
  6. all sinks, tubs and showers for functional drainage;
  7. the drain, waste and vent system; and
  8. drainage sump pumps with accessible floats.

II. The inspector shall describe:

  1. whether the water supply is public or private based upon observed evidence;
  2. the location of the main water supply shut-off valve;
  3. the location of the main fuel supply shut-off valve;
  4. the location of any observed fuel-storage system; and
  5. the capacity of the water heating equipment, if labeled.

III. The inspector shall report as in need of correction:

  1. deficiencies in the water supply by viewing the functional flow in two fixtures operated simultaneously;
  2. deficiencies in the installation of hot and cold water faucets;
  3. active plumbing water leaks that were observed during the inspection; and  
  4. toilets that were damaged, had loose connections to the floor, were leaking, or had tank components that did not operate.

IV. The inspector is not required to:

  1. light or ignite pilot flames.
  2. measure the capacity, temperature, age, life expectancy or adequacy of the water heater. 
  3. inspect the interior of flues or chimneys, combustion air systems, water softener or filtering systems, well pumps or tanks, safety or shut-off valves, floor drains, lawn sprinkler systems, or fire sprinkler systems. 
  4. determine the exact flow rate, volume, pressure, temperature or adequacy of the water supply. 
  5. determine the water quality, potability or reliability of the water supply or source. 
  6. open sealed plumbing access panels. 
  7. inspect clothes washing machines or their connections. 
  8. operate any valve.
  9. test shower pans, tub and shower surrounds or enclosures for leakage or for functional overflow protection. 
  10. evaluate the compliance with conservation, energy or building standards, or the proper design or sizing of any water, waste or venting components, fixtures or piping. 
  11. determine the effectiveness of anti-siphon, back-flow prevention or drain-stop devices. 
  12. determine whether there are sufficient cleanouts for effective cleaning of drains. 
  13. evaluate fuel storage tanks or supply systems.
  14. inspect wastewater treatment systems.
  15. inspect water treatment systems or water filters. 
  16. inspect water storage tanks, pressure pumps, or bladder tanks. 
  17. evaluate wait time to obtain hot water at fixtures, or perform testing of any kind to water heater elements. 
  18. evaluate or determine the adequacy of combustion air. 
  19. test, operate, open or close: safety controls, manual stop valves, temperature/pressure-relief valves, control valves, or check valves.
  20. examine ancillary or auxiliary systems or components, such as, but not limited to, those related to solar water heating and hot water circulation.
  21. determine the existence or condition of polybutylene, polyethylene, or similar plastic piping.
  22. inspect or test for gas or fuel leaks, or indications thereof.

3.7 Electrical

I. The inspector shall inspect:

  1. the service drop;
  2. the overhead service conductors and attachment point;
  3. the service head, gooseneck and drip loops;
  4. the service mast, service conduit and raceway;
  5. the electric meter and base;
  6. service-entrance conductors;
  7. the main service disconnect;
  8. panelboards and over-current protection devices (circuit breakers and fuses);
  9. service grounding and bonding;
  10. a representative number of switches, lighting fixtures and receptacles, including receptacles observed and deemed to be arc-fault circuit interrupter (AFCI)-protected using the AFCI test button, where possible;
  11. all ground-fault circuit interrupter receptacles and circuit breakers observed and deemed to be GFCIs using a GFCI tester, where possible; and
  12. for the presence of smoke and carbon monoxide detectors.

II. The inspector shall describe:

  1. the main service disconnect’s amperage rating, if labeled; and 
  2. the type of wiring observed.

III. The inspector shall report as in need of correction:

  1. deficiencies in the integrity of the service-entrance conductors’ insulation, drip loop, and vertical clearances from grade and roofs;
  2. any unused circuit-breaker panel opening that was not filled;
  3. the presence of solid conductor aluminum branch-circuit wiring, if readily visible;
  4. any tested receptacle in which power was not present, polarity was incorrect, the cover was not in place, the GFCI devices were not properly installed or did not operate properly, evidence of arcing or excessive heat, and where the receptacle was not grounded or was not secured to the wall; and
  5. the absence of smoke and/or carbon monoxide detectors.

IV. The inspector is not required to:

  1. insert any tool, probe or device into the main panelboard, sub-panels, distribution panelboards, or electrical fixtures.
  2. operate electrical systems that are shut down. 
  3. remove panelboard cabinet covers or dead fronts.
  4. operate or re-set over-current protection devices or overload devices. 
  5. operate or test smoke or carbon monoxide detectors or alarms.
  6. inspect, operate or test any security, fire or alarm systems or components, or other warning or signaling systems.
  7. measure or determine the amperage or voltage of the main service equipment, if not visibly labeled.
  8. inspect ancillary wiring or remote-control devices. 
  9. activate any electrical systems or branch circuits that are not energized. 
  10. inspect low-voltage systems, electrical de-icing tapes, swimming pool wiring, or any time-controlled devices. 
  11. verify the service ground. 
  12. inspect private or emergency electrical supply sources, including, but not limited to: generators, windmills, photovoltaic solar collectors, or battery or electrical storage facility. 
  13. inspect spark or lightning arrestors.
  14. inspect or test de-icing equipment. 
  15. conduct voltage-drop calculations. 
  16. determine the accuracy of labeling.
  17. inspect exterior lighting. 

3.8 Fireplace   

I. The inspector shall inspect:

  1. readily accessible and visible portions of the fireplaces and chimneys;
  2. lintels above the fireplace openings;
  3. damper doors by opening and closing them, if readily accessible and manually operable; and
  4. cleanout doors and frames.

II. The inspector shall describe:

  1. the type of fireplace.

III. The inspector shall report as in need of correction:

  1. evidence of joint separation, damage or deterioration of the hearth, hearth extension or chambers;
  2. manually operated dampers that did not open and close;
  3. the lack of a smoke detector in the same room as the fireplace;
  4. the lack of a carbon monoxide detector in the same room as the fireplace; and
  5. cleanouts not made of metal, pre-cast cement, or other non-combustible material.

IV. The inspector is not required to:

  1. inspect the flue or vent system.
  2. inspect the interior of chimneys or flues, fire doors or screens, seals or gaskets, or mantels. 
  3. determine the need for a chimney sweep. 
  4. operate gas fireplace inserts. 
  5. light pilot flames. 
  6. determine the appropriateness of any installation. 
  7. inspect automatic fuel-fed devices. 
  8. inspect combustion and/or make-up air devices. 
  9. inspect heat-distribution assists, whether gravity-controlled or fan-assisted. 
  10. ignite or extinguish fires. 
  11. determine the adequacy of drafts or draft characteristics. 
  12. move fireplace inserts, stoves or firebox contents. 
  13. perform a smoke test.
  14. dismantle or remove any component.
  15. perform a National Fire Protection Association (NFPA)-style inspection.
  16. perform a Phase I fireplace and chimney inspection.

3.9 Attic, Insulation & Ventilation

I. The inspector shall inspect:

  1. insulation in unfinished spaces, including attics, crawlspaces and foundation areas;
  2. ventilation of unfinished spaces, including attics, crawlspaces and foundation areas; and
  3. mechanical exhaust systems in the kitchen, bathrooms and laundry area.

II. The inspector shall describe:

  1. the type of insulation observed; and
  2. the approximate average depth of insulation observed at the unfinished attic floor area or roof structure.

III. The inspector shall report as in need of correction:

  1. the general absence of insulation or ventilation in unfinished spaces.

IV. The inspector is not required to:

  1. enter the attic or any unfinished spaces that are not readily accessible, or where entry could cause damage or, in the inspector’s opinion, pose a safety hazard.
  2. move, touch or disturb insulation. 
  3. move, touch or disturb vapor retarders. 
  4. break or otherwise damage the surface finish or weather seal on or around access panels or covers. 
  5. identify the composition or R-value of insulation material. 
  6. activate thermostatically operated fans. 
  7. determine the types of materials used in insulation or wrapping of pipes, ducts, jackets, boilers or wiring.
  8. determine the adequacy of ventilation.

3.10 Doors, Windows & Interior

I. The inspector shall inspect:

  1. a representative number of doors and windows by opening and closing them;
  2. floors, walls and ceilings;
  3. stairs, steps, landings, stairways and ramps;
  4. railings, guards and handrails; and
  5. garage vehicle doors and the operation of garage vehicle door openers, using normal operating controls.

II. The inspector shall describe:

  1. a garage vehicle door as manually-operated or installed with a garage door opener.

III. The inspector shall report as in need of correction:

  1. improper spacing between intermediate balusters, spindles and rails for steps, stairways, guards and railings;
  2. photo-electric safety sensors that did not operate properly; and
  3. any window that was obviously fogged or displayed other evidence of broken seals.

IV. The inspector is not required to:

  1. inspect paint, wallpaper, window treatments or finish treatments.
  2. inspect floor coverings or carpeting.
  3. inspect central vacuum systems. 
  4. inspect for safety glazing. 
  5. inspect security systems or components. 
  6. evaluate the fastening of islands, countertops, cabinets, sink tops or fixtures. 
  7. move furniture, stored items, or any coverings, such as carpets or rugs, in order to inspect the concealed floor structure. 
  8. move suspended-ceiling tiles. 
  9. inspect or move any household appliances. 
  10. inspect or operate equipment housed in the garage, except as otherwise noted. 
  11. verify or certify the proper operation of any pressure-activated auto-reverse or related safety feature of a garage door. 
  12. operate or evaluate any security bar release and opening mechanisms, whether interior or exterior, including their compliance with local, state or federal standards. 
  13. operate any system, appliance or component that requires the use of special keys, codes, combinations or devices. 
  14. operate or evaluate self-cleaning oven cycles, tilt guards/latches, or signal lights. 
  15. inspect microwave ovens or test leakage from microwave ovens. 
  16. operate or examine any sauna, steam-generating equipment, kiln, toaster, ice maker, coffee maker, can opener, bread warmer, blender, instant hot-water dispenser, or other small, ancillary appliances or devices. 
  17. inspect elevators. 
  18. inspect remote controls. 
  19. inspect appliances. 
  20. inspect items not permanently installed.
  21. discover firewall compromises. 
  22. inspect pools, spas or fountains.
  23. determine the adequacy of whirlpool or spa jets, water force, or bubble effects. 
  24. determine the structural integrity or leakage of pools or spas.

4. Glossary of Terms

  • accessible:  In the opinion of the inspector, can be approached or entered safely, without difficulty, fear or danger.
  • activate:  To turn on, supply power, or enable systems, equipment or devices to become active by normal operating controls. Examples include turning on the gas or water supply valves to the fixtures and appliances, and activating electrical breakers or fuses.
  • adversely affect:  To constitute, or potentially constitute, a negative or destructive impact.
  • alarm system:  Warning devices, installed or freestanding, including, but not limited to: carbon monoxide detectors, flue gas and other spillage detectors, security equipment, ejector pumps, and smoke alarms.
  • appliance:  A household device operated by the use of electricity or gas. Not included in this definition are components covered under central heating, central cooling or plumbing.
  • architectural service:  Any practice involving the art and science of building design for construction of any structure or grouping of structures, and the use of space within and surrounding the structures or the design, design development, preparation of construction contract documents, and administration of the construction contract.
  • component:  A permanently installed or attached fixture, element or part of a system.
  • condition:  The visible and conspicuous state of being of an object.
  • correction:  Something that is substituted or proposed for what is incorrect, deficient, unsafe, or a defect.
  • cosmetic defect:  An irregularity or imperfection in something, which could be corrected, but is not required.
  • crawlspace:  The area within the confines of the foundation and between the ground and the underside of the lowest floor’s structural component.
  • decorative:  Ornamental; not required for the operation of essential systems or components of a home.
  • describe:  To report in writing a system or component by its type or other observed characteristics in order to distinguish it from other components used for the same purpose.
  • determine:  To arrive at an opinion or conclusion pursuant to examination.
  • dismantle:  To open, take apart or remove any component, device or piece that would not typically be opened, taken apart or removed by an ordinary occupant.
  • engineering service:  Any professional service or creative work requiring engineering education, training and experience, and the application of special knowledge of the mathematical, physical and engineering sciences to such professional service or creative work as consultation, investigation, evaluation, planning, design and supervision of construction for the purpose of assuring compliance with the specifications and design, in conjunction with structures, buildings, machines, equipment, works and/or processes.
  • enter:  To go into an area to observe visible components.
  • evaluate:  To assess the systems, structures and/or components of a property.
  • evidence:  That which tends to prove or disprove something; something that makes plain or clear; grounds for belief; proof.
  • examine:  To visually look (see inspect).
  • foundation:  The base upon which the structure or wall rests, usually masonry, concrete or stone, and generally partially underground.
  • function:  The action for which an item, component or system is specially fitted or used, or for which an item, component or system exists; to be in action or perform a task.
  • functional:  Performing, or able to perform, a function.
  • functional defect:  A lack of or an abnormality in something that is necessary for normal and proper functioning and operation, and, therefore, requires further evaluation and correction.
  • general home inspection:  See “home inspection.”
  • home inspection:  The process by which an inspector visually examines the readily accessible systems and components of a home and operates those systems and components utilizing this Standards of Practice as a guideline.
  • household appliances:  Kitchen and laundry appliances, room air conditioners, and similar appliances.
  • identify:  To notice and report.
  • indication:  That which serves to point out, show, or make known the present existence of something under certain conditions.
  • inspect:  To examine readily accessible systems and components safely, using normal operating controls, and accessing readily accessible areas, in accordance with this Standards of Practice.
  • inspected property:  The readily accessible areas of the home, house, or building, and the components and systems included in the inspection. 
  • inspection report:  A written communication (possibly including images) of any material defects observed during the inspection.
  • inspector:  One who performs a real estate inspection.
  • installed:  Attached or connected such that the installed item requires a tool for removal.
  • material defect:  A specific issue with a system or component of a residential property that may have a significant, adverse impact on the value of the property, or that poses an unreasonable risk to people.  The fact that a system or component is near, at, or beyond the end of its normal, useful life is not, in itself, a material defect.
  • normal operating controls:  Describes the method by which certain devices (such as thermostats) can be operated by ordinary occupants, as they require no specialized skill or knowledge.
  • observe:  To visually notice.
  • operate:  To cause systems to function or turn on with normal operating controls.
  • readily accessible:  A system or component that, in the judgment of the inspector, is capable of being safely observed without the removal of obstacles, detachment or disengagement of connecting or securing devices, or other unsafe or difficult procedures to gain access.
  • recreational facilities:  Spas, saunas, steam baths, swimming pools, tennis courts, playground equipment, and other exercise, entertainment and athletic facilities.
  • report (verb form): To express, communicate or provide information in writing; give a written account of.  (See also inspection report.)
  • representative number:  A number sufficient to serve as a typical or characteristic example of the item(s) inspected.
  • residential property:  Four or fewer residential units.
  • residential unit:  A home; a single unit providing complete and independent living facilities for one or more persons, including permanent provisions for living, sleeping, eating, cooking and sanitation.
  • safety glazing:  Tempered glass, laminated glass, or rigid plastic.
  • shut down:  Turned off, unplugged, inactive, not in service, not operational, etc.
  • structural component:  A component that supports non-variable forces or weights (dead loads) and variable forces or weights (live loads).
  • system:  An assembly of various components which function as a whole.
  • technically exhaustive:  A comprehensive and detailed examination beyond the scope of a real estate home inspection that would involve or include, but would not be limited to:  dismantling, specialized knowledge or training, special equipment, measurements, calculations, testing, research, analysis, or other means.
  • unsafe:  In the inspector’s opinion, a condition of an area, system, component or procedure that is judged to be a significant risk of injury during normal, day-to-day use. The risk may be due to damage, deterioration, improper installation, or a change in accepted residential construction standards.
  • verify:  To confirm or substantiate.

What is Efflorescence?

Efflorescence is the white chalky powder that you might find on the surface of a concrete or brick wall. It can be a cosmetic issue, or it can be an indication of moisture intrusion that could lead to major structural and indoor air quality issues. 

 Indications of Moisture

Efflorescence (which means “to flower out” in French) is the dissolved salts deposited on the surface of a porous material (such as concrete or brick) that are visible after the evaporation of the water in which it was transported. The moisture that creates efflorescence often comes from groundwater, but rainwater can also be the source. Efflorescence alone does not pose a major problem, but it can be an indication of moisture intrusion, which may compromise the structural material.

Porous Building Materials

Building materials, such as concrete, wood, brick and stone, are porous materials. Porous materials can absorb or wick water by a process called capillary action. As water moves through the porous material, salts can be drawn with it.

Concrete, wood, brick, stone and mortar are porous materials that contain salts. The ground in which these materials can come into contact also contain salts. Capillary action can literally suck water and transport it through porous building materials.

Capillary Action

Porous building materials are capable of wicking water for large distances due to capillary action with a theoretical limit of capillary rise of about 6 miles. That’s 6 miles directly up. Think of a tree and how a tree can transport water from its roots to its leaves. That’s capillary action. And it’s very powerful. When you add salt to that capillary process, it can be destructive.  Salts dissolved by groundwater can be transported by capillary action through porous soil. Building materials in contact with soil will naturally wick the water inward and upward. Take concrete footings — they are typically poured directly onto soil without any capillary break. Sometimes this is called rising damp. This is the beginning of how water can wick upward into a structure.

Destructive Pressures

When the capillary flow of water reaches the surface of a building material, evaporation occurs. As the water evaporates, salt is left behind. As this evaporation of capillary flow continues, the salt concentration increases, which creates an imbalance, and nature abhors imbalance and always wants to put things back into equilibrium. This is process is called osmosis. To re-establish equilibrium through osmosis, water rushes toward the salt deposit to dilute the concentration. This rush of water creates massive hydrostatic pressures within the porous material, and these pressures are destructive.

The pressure from osmosis can create incredibly strong hydrostatic pressure that can exceed the strength of building materials, including concrete.

Here are some examples of how that pressure translates:

  • diffusion vapor pressure: 0.3 to 0.5 psi         
  • capillary pressure: 300 to 500 psi      
  • osmotic pressure: 3,000 to 5,000 psi  

As you can see from the list above, osmosis can create pressure that is greater than the structural strength of concrete, which can be from 2,000 psi to 3,000 psi. The action of water rushing to the surface due to capillary action creates incredible forces that can cause materials to crack, flake and break apart.

Spalling

When efflorescence leads to strong osmotic pressures—greater than the strength of the building material—and the material literally breaks apart, the resulting damage is called spalling. Hydrostatic pressure can cause spalling, but spalling can also be caused by freeze-thaw cycles in building materials that have a high moisture content.

Both efflorescence and spalling can be prevented with capillary breaks, such as by installing a polyethylene sheeting under a concrete slab.

Identifying Efflorescence 

InterNACHI inspectors should already know how to distinguish between mold and efflorescence, but it is possible for homeowners to confuse the two. The expense of a mold test can be avoided if the substance in question can be identified as efflorescence. Here are a few tips that inspectors can offer their clients so that they understand the differences: 

  • Pinched between the fingers, efflorescence will turn into a powder, while mold will not.
  • Efflorescence forms on inorganic building materials, while mold forms on organic substances. However, it is possible for mold to consume dirt on brick or cement.
  • Efflorescence will dissolve in water, while mold will not.
  • Efflorescence is almost always white, yellow or brown, while mold can be any color imaginable. If the substance in question is purple, pink or black, it is not efflorescence.

Aside from mold, the following conditions can result from excess moisture in a residence: 

  • fungi that rot wood;
  • water damage to sheetrock; and
  • reduced effectiveness of insulation.

Inspectors should note the presence of efflorescence in their inspection reports because it generally occurs where there is excess moisture, a condition that also encourages the growth of mold. 

Prevention and Removal of Efflorescence 

Prevention

  • An impregnating hydrophobic sealant can be applied to a surface to prevent the intrusion of water. It will also prevent water from traveling to the surface from within. In cold climates, this sealant can cause material to break during freeze/thaw cycles.
  • During home construction, bricks left out overnight should be kept on pallets and be covered. Moisture from damp soil and rain can be absorbed into the brick.
  • Install capillary breaks, including polyethylene sheeting between the soil and the building material, such as concrete.

Removal

  • Pressurized water can sometimes be used to remove or dissolve efflorescence.
  • An acid, such as diluted muriatic acid, can be used to dissolve efflorescence. Water should be applied first so that the acid does not discolor the brick. Following application, baking soda can be used to neutralize the acid and prevent any additional damage to the masonry. Muriatic acid is toxic, and contact with skin or eyes should be avoided. 
  • A strong brush can be used to simply scrub the efflorescence off.

NOTE:  The use of water to remove efflorescence may result in the re-absorption of crystals into the host material, and they may later reappear as more efflorescence. It is advisable that if water is used in the removal process that the masonry is dried off very quickly. 

In summary, efflorescence is a cosmetic issue, but it indicates a potential moisture problem. Inspectors should know the how capillary forces can cause structural damage to building materials and educate their clients about efflorescence and the potential problems it may cause.